GPSCOTECH – Quick Start Guide
Protect What Matters – Reliable GPS Tracking
This Quick Start Guide will walk you through unboxing, setup, and using your GPS device.
Access via Mobile App
Manage your tracker from anywhere with the GPS Our World App:
- Available on iOS App Store and Google Play Store (GPS Our World)
- Or scan the QR codes below:
Download Our Android App


Download Our Apple App


Activate Service & Free Trial
- Enter your credit card during account setup to activate your 3-months free trial.
- After the trial, billing starts automatically to keep your service running without interruption.
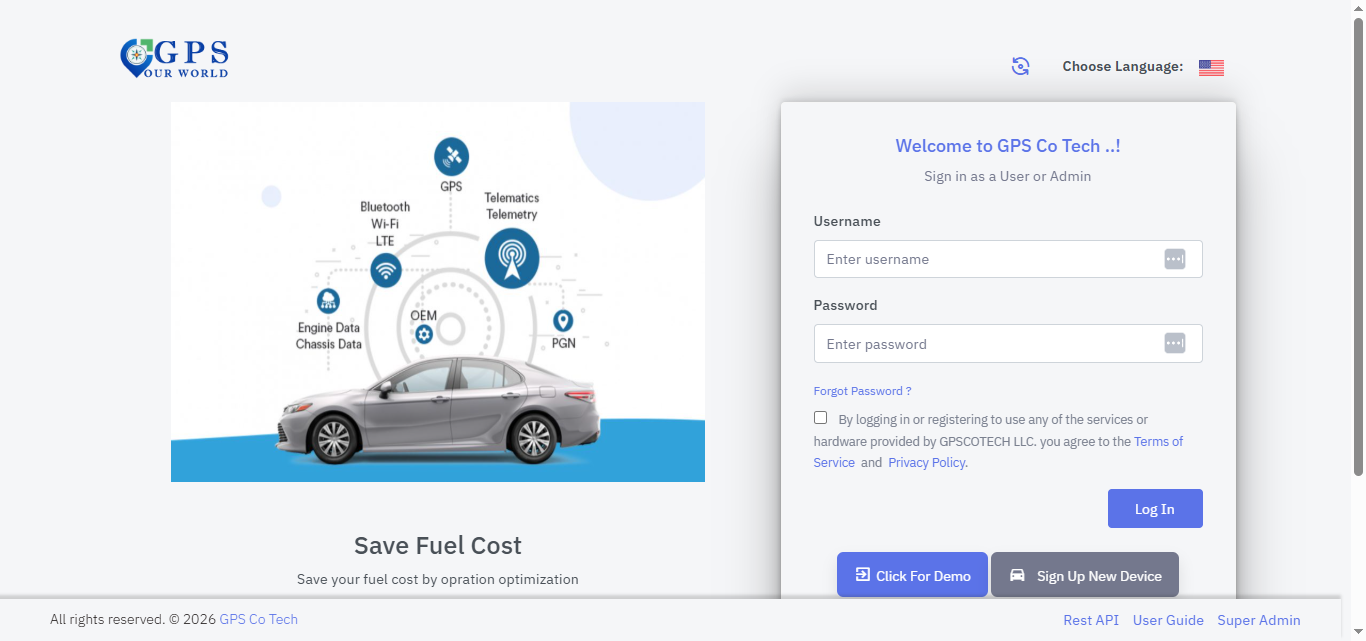
Create Your Account & Register Device
- Open your web browser → go to www.gpscotech.com
- Click “Sign In” → select “Tracking Dashboard.”
- On the login page, click “Sign Up New Device.”
- Locate the SN number printed on your tracker.
- Enter it in the IMEI/SN/ID field with a “0” first. Example: SN = 1234567890 → enter as 01234567890
- Enter your Vehicle Name/Type (e.g., “Toyota Camry,” “Delivery Van”).
- Select your Device Model from the dropdown.
- Choose “New User” and complete the registration form (set your username, password, and email).
- Click “Register My New Device” to finish setup.
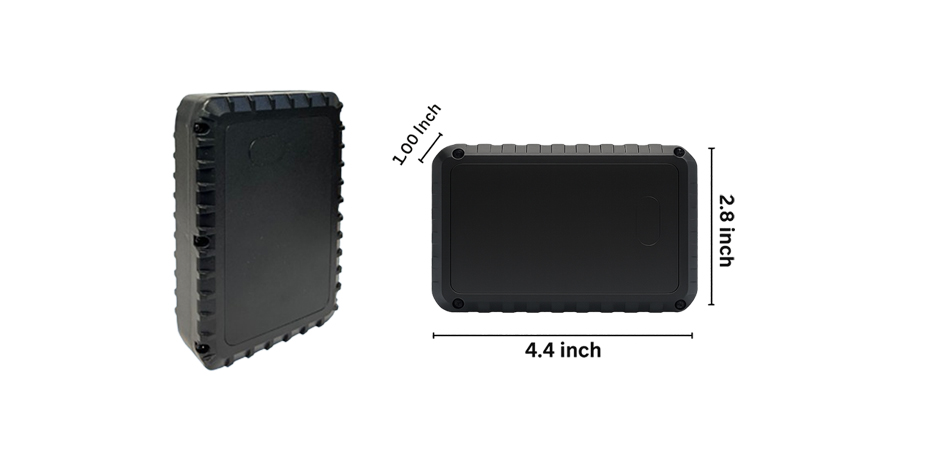
Device Components
- SIM Slot (pre-installed) – no need to remove
Install Your Tracker
Step 1: Charge the Device
Before installation, fully charge the tracker using the provided USB charging cable.
- A full charge ensures accurate tracking and optimal battery performance.
- The indicator light will confirm when charging is complete.
Step 2: Choose a Secure Mounting Location
Select a hidden, secure, and metal surface for installation. Common locations include:
- Under the vehicle (on the chassis or frame)
- Inside the trunk or cargo area
- Under a seat or within a metal compartment
⚠️ Ensure the location:
- Is metal (for strong magnetic hold)
- Is not directly exposed to extreme heat or moving parts
- Does not block GPS signal completely (avoid fully enclosed metal boxes)
Step 3: Mount the Tracker
Place the tracker flat against the metal surface.
- The built-in high-strength magnet will securely attach the device.
- Gently tug to confirm it is firmly mounted.
Step 4: Verify Installation
Once installed:
- Check the app or dashboard to confirm the device is online
- Move the vehicle slightly to ensure location updates are received
Your magnetic GPS tracker is now installed and ready to use.
LED Light Indicators
| Colour | Status | Description |
|---|---|---|
| Green | Off | Device is powered off or not working |
| Green | ON | Device is powered on, but SIM card is not recognized |
| Green | Blinking (every 0.1s) | Searching for cellular network or connecting to the platform |
| Green | Blinking (Every 1s) | Device is online |
| Blue | Off | Serial port not loaded to peripheral driver |
| Blue | ON | Peripherals not connected |
| Blue | Blinking (every 0.1s) | Abnormal peripheral communication |
| Blue | Blinking (Every 1s) | Peripheral communication is normal |
| Red | Off | No GPS data |
| Red | Blinking (every 0.1s) | Searching for GPS signal |
| Red | Blinking (Every 1s) | GPS signal valid |
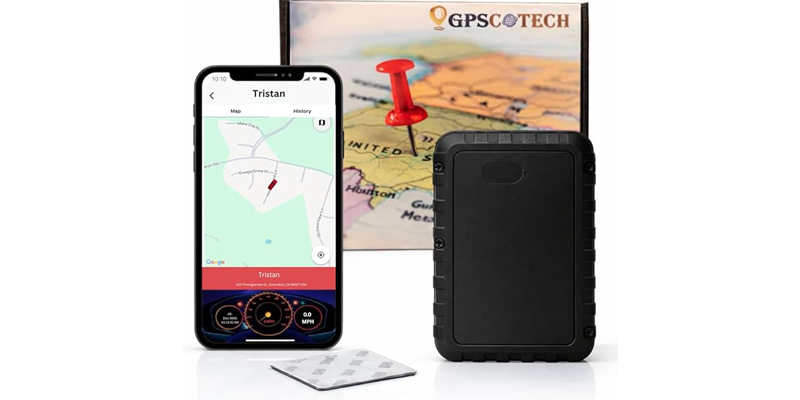
Package Contents
Your GPSCOTECH package includes:
- Wireless GPS Tracker (Magnetic)
- Built-in battery (10,500 mAh)
- Quick Start Guide
- USB Cable
- Magnet Mount
Geofencing Setup
- Log in to Dashboard
- Go to Utility > Geofence & POI
- Click ‘Add New’
- Select a desired shape from the menu on the left side of the map
- Draw your shape
- Enter the name, description, and boundary tolerance
- Click ‘Save’
On Mobile:
- Log in to [MOBILE APPLICATION]
- Go to Others > Geofence
- Tap the ‘+’ at the bottom right of the screen
- Select your desired shape
- Tap to draw your geofence
- For polygons, tap to mark one corner of the geofenced area
- For circles, tap to denote the center of the circle
- Enter a name and description
- Tap ‘Save’
History & Reports
Access past data anytime in the History Replay section:
- History Report – Every recorded point
- Trip Report – Groups movement into trips
- Alert Report – Log of triggered alerts
How to Share Locations Externally
To share location data without giving access to your account, you can use our Location Sharing feature:
On Our Website:
- Log in to Dashboard
- Go to Admin > External Tracking / Location Share
- Select the vehicle(s) you want to share location data for
- Select the date you want the link to be valid until.
- Select the additional information you want to share (Points of Interest, Geofence Areas, Detailed Vehicle Labels, and/or Driving History Trails)
- Click ‘Generate Link’
- Send the generated URL with whomever you want to share location data.
On Our Mobile App:
- Log in to [MOBILE APPLICATION]
- Go to Others > Share Location
- Tap the ‘+’ icon in the top right corner
- Select the vehicle you want to share location data for
- Select the date you want the link to be valid until.
- Tap ‘Create’
- Send the generated URL with whomever you want to share location data.
Please note that on the mobile app links can only be generated for single vehicles. For links that incorporate multiple vehicles you should use our dashboard website.
POI Setup (Points of Interest)
Points of Interest can only be created on our website:
- Log in to Dashboard
- Go to Utility > Geofence & POI
- Select ‘POI’ (above the map, on the right)
- Click ‘Add New’
- Click the marker icon on the left side of the map
- Click the desired location on the map
- Enter the name, description, and boundary tolerance
- Select the desired category from the dropdown menu
- Select an icon
- Click ‘Save’
Time zone Set up
To change the time zone, you can follow these steps:
- Log in to Dashboard
- Go to Admin > Vehicles
- Click the name of the vehicle you want to change
- Click the pencil icon next to Edit
- Select your UTC time zone from the list
- Click Save
The time zone cannot currently be changed on the mobile app. Please note that our system uses UTC (Coordinated Universal Time) and will not update with daylight savings time.
How to Renew A Subscription / Start a New Subscription
If you're looking to restart your subscription you can do so on our website:
- Log in to Dashboard
- Go to Admin > Renewals/Billing
- Click 'Renew Now' on the vehicle
- Select your desired plan type
- Enter your credit card information
- Click 'Pay Now'
If you had a previous subscription for the unit, please ensure the old subscription has been canceled so you aren’t double charged.
How to Cancel Subscriptions
Subscriptions can be only canceled on our website, or manually by an administrator:
- Log in to Dashboard
- Go to Admin > My Subscriptions
- Click Stop Subscription for the device you wish to cancel your subscription for.
You will continue to receive service until the end of the active billing period, after which your device’s SIM card will be deactivated.
May I ask why you’re looking to cancel? This information would be solely for our records.
How to Restart a Canceled Subscription
Subscriptions can only be restarted on our website. You can restart a subscription by:
- Logging in to Dashboard
- Click on Admin > Renewals/Billing
- Click 'Renew Now' next to the device you want to restart
- Select a plan type
- Re-enter your card details
- Click 'Pay Now'
Your service will resume as soon as our dashboard receives confirmation of payment from our payment gateway provider.
How to Update Card Details
You can update your payment card details on our website:
- Log in to Dashboard
- Go to Admin > My Subscription
- Click Edit on the subscription you wish to update the card details for
- Click Change Card Details
- Enter updated card information
- Click Update
You’ll have to do this separately for each subscription that you wish to update.
Subscriptions & Plans
Your GPSCOTECH requires an active data subscription:
- Monthly plan: $6.99/month: Flexible, cancel anytime
- Annual plan: $64.99/year ($5.41/month)
- 2-year plan: $119.76/2 year (4.99/month)
Battery Interval
Battery life varies based on the selected location update interval.
- Every 10 seconds: less than 1 day
- Every 1 minute: up to 2 days
- Every 60 minutes: up to 125 days
- Every 24 hours: up to 4–6 years
Actual battery performance may vary depending on vehicle movement, signal strength, and environmental conditions. Selecting a longer update interval significantly extends battery life.
How to Change Time Intervals
If you'd like to change the reporting interval of your GCTECH B2 unit yourself you can do so on our website:
- Log in to Dashboard
- Go to Map and click the arrow tab on the left
- Select the desired vehicle from the list
- At the bottom of the screen, select Set Interval and enter the desired interval in seconds.
Or on our mobile app:
- Log in to [MOBILE APP]
- Go to Others > Command
- Select the desired vehicle
- Enter the desired time interval in seconds
Please note that shorter time intervals will increase the frequency at which you need to recharge the unit.
Customer Support
We’re here to help!
- 📞 Phone: 1-855-953-2093 (Mon–Fri, 8 AM–4 PM PST)
- ✉️ Email: info@gpscotech.com
- 🌐 Website: gpscotech.com
Lithium Battery Safety
- Do not crush, puncture, or disassemble the battery.
- Do not expose the device to fire, extreme heat, or direct sunlight for extended periods.
- Use only the provided or approved charging cable and power source.
- Do not charge the device if it is damaged, wet, or overheated.
- Stop using the device immediately if the battery swells, leaks, emits odor, or becomes unusually hot.
- Keep the device away from children and pets.
- Dispose of the battery according to local regulations—do not throw in household trash.
Troubleshooting
- No GPS location? Make sure the tracker is placed outdoors or near a window with a clear view of the sky. Thick walls or metal surfaces can block GPS signals.
- Device won’t power? Check the battery level and recharge the unit fully.
- Inaccurate location? The tracker may temporarily use cellular (GSM) location. Take the vehicle outside and drive for a few minutes to allow GPS to lock accurately.
GPSCOTECH – Protect What Matters. Anywhere. Anytime.