GPSCOTECH – Quick Start Guide
Protect What Matters – Reliable GPS Tracking
This Quick Start Guide will walk you through unboxing, setup, and using your GPS device.

Access via Mobile App
Manage your tracker from anywhere with the GPS Our World App:
- Available on iOS App Store and Google Play Store (GPS Our World)
- Or scan the QR codes below:
Download Our Android App


Download Our Apple App


Activate Service & Free Trial
- Enter your credit card during account setup to activate your 3-months free trial.
- After the trial, billing starts automatically to keep your service running without interruption.
Create Your Account & Register Device
- Open your web browser → go to www.gpscotech.com
- Click “Sign In” → select “Tracking Dashboard.”
- On the login page, click “Sign Up New Device.”
- Locate the SN number printed on your tracker.
- Enter it in the IMEI/SN/ID field with a “0” first. Example: SN = 1234567890 → enter as 01234567890
- Enter your Vehicle Name/Type (e.g., “Toyota Camry,” “Delivery Van”).
- Select your Device Model from the dropdown.
- Choose “New User” and complete the registration form (set your username, password, and email).
- Click “Register My New Device” to finish setup.
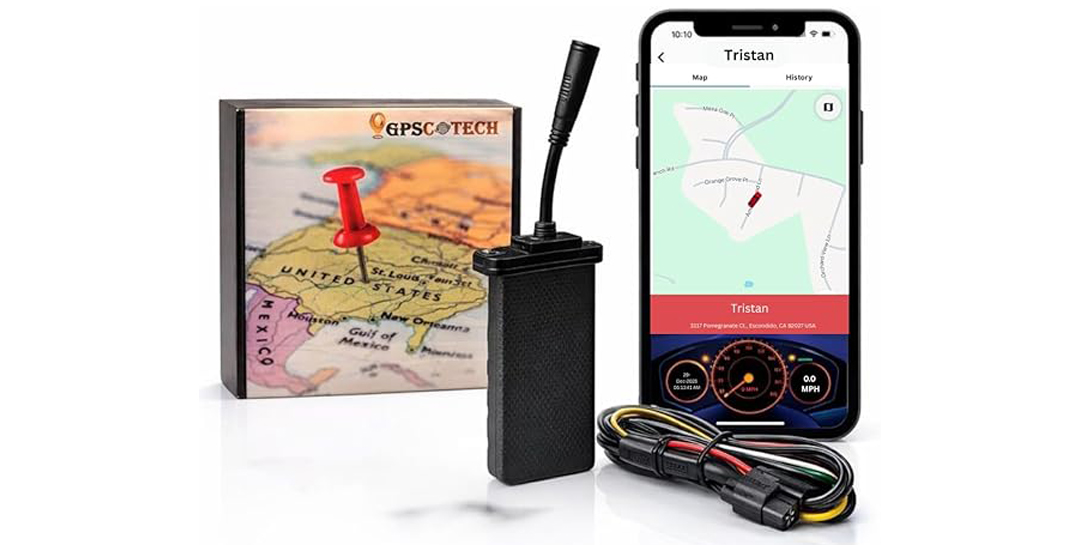
Device Components
- SIM Slot (pre-installed) – no need to remove
Install Your Tracker
Choose a Mounting Location
- Install the tracker under the dashboard or below the front windshield
- Keep the device flat and facing up
- Make sure it has a clear view of the sky
❌ Avoid:
- Metal coverings
- Areas that may get wet
- Placing it upside down
Power Connection
Connect the wires directly to the vehicle battery:
- Red wire → Battery Positive (+)
- Black wire → Battery Negative (–)
Once connected, the device will power on automatically.
Ignition Connection (Optional but Recommended)
- Connect the White wire to the vehicle’s ignition signal wire
- This allows the tracker to detect engine ON / OFF status
If unsure, a professional installer can connect this safely.
Mount the Device Securely
- Use zip ties or mounting brackets
- Ensure the label “This side facing up” points upward
- Keep it firmly secured to avoid vibration
LED Light Indicators
| Colour | Status | Description |
|---|---|---|
| Green | Off | Device is powered off or not working |
| Green | ON | Device is powered on, but SIM card is not recognized |
| Green | Blinking (every 0.1s) | Searching for cellular network or connecting to the platform |
| Green | Blinking (Every 1s) | Device is online |
| Blue | Off | Serial port not loaded to peripheral driver |
| Blue | ON | Peripherals not connected |
| Blue | Blinking (every 0.1s) | Abnormal peripheral communication |
| Blue | Blinking (Every 1s) | Peripheral communication is normal |
| Red | Off | No GPS data |
| Red | Blinking (every 0.1s) | Searching for GPS signal |
| Red | Blinking (Every 1s) | GPS signal valid |
Package Contents
Your GPSCOTECH package includes:
- Wired GPS Tracker
- Wire Harness
- Quick Start Guide
Geofencing Setup
- Log in to Dashboard
- Go to Utility > Geofence & POI
- Click ‘Add New’
- Select a desired shape from the menu on the left side of the map
- Draw your shape
- Enter the name, description, and boundary tolerance
- Click ‘Save’
On Mobile:
- Log in to [MOBILE APPLICATION]
- Go to Others > Geofence
- Tap the ‘+’ at the bottom right of the screen
- Select your desired shape
- Tap to draw your geofence
- For polygons, tap to mark one corner of the geofenced area
- For circles, tap to denote the center of the circle
- Enter a name and description
- Tap ‘Save’
History & Reports
Access past data anytime in the History Replay section:
- History Report – Every recorded point
- Trip Report – Groups movement into trips
- Alert Report – Log of triggered alerts
How to Share Locations Externally
To share location data without giving access to your account, you can use our Location Sharing feature:
On Our Website:
- Log in to Dashboard
- Go to Admin > External Tracking / Location Share
- Select the vehicle(s) you want to share location data for
- Select the date you want the link to be valid until.
- Select the additional information you want to share (Points of Interest, Geofence Areas, Detailed Vehicle Labels, and/or Driving History Trails)
- Click ‘Generate Link’
- Send the generated URL with whomever you want to share location data.
On Our Mobile App:
- Log in to [MOBILE APPLICATION]
- Go to Others > Share Location
- Tap the ‘+’ icon in the top right corner
- Select the vehicle you want to share location data for
- Select the date you want the link to be valid until.
- Tap ‘Create’
- Send the generated URL with whomever you want to share location data.
Please note that on the mobile app links can only be generated for single vehicles. For links that incorporate multiple vehicles you should use our dashboard website.
POI Setup (Points of Interest)
Points of Interest can only be created on our website:
- Log in to Dashboard
- Go to Utility > Geofence & POI
- Select ‘POI’ (above the map, on the right)
- Click ‘Add New’
- Click the marker icon on the left side of the map
- Click the desired location on the map
- Enter the name, description, and boundary tolerance
- Select the desired category from the dropdown menu
- Select an icon
- Click ‘Save’
Time zone Set up
To change the time zone, you can follow these steps:
- Log in to Dashboard
- Go to Admin > Vehicles
- Click the name of the vehicle you want to change
- Click the pencil icon next to Edit
- Select your UTC time zone from the list
- Click Save
The time zone cannot currently be changed on the mobile app. Please note that our system uses UTC (Coordinated Universal Time) and will not update with daylight savings time.
How to Renew A Subscription / Start a New Subscription
If you're looking to restart your subscription you can do so on our website:
- Log in to Dashboard
- Go to Admin > Renewals/Billing
- Click 'Renew Now' on the vehicle
- Select your desired plan type
- Enter your credit card information
- Click 'Pay Now'
If you had a previous subscription for the unit, please ensure the old subscription has been canceled so you aren’t double charged.
How to Cancel Subscriptions
Subscriptions can be only canceled on our website, or manually by an administrator:
- Log in to Dashboard
- Go to Admin > My Subscriptions
- Click Stop Subscription for the device you wish to cancel your subscription for.
You will continue to receive service until the end of the active billing period, after which your device’s SIM card will be deactivated.
May I ask why you’re looking to cancel? This information would be solely for our records.
How to Restart a Canceled Subscription
Subscriptions can only be restarted on our website. You can restart a subscription by:
- Logging in to Dashboard
- Click on Admin > Renewals/Billing
- Click 'Renew Now' next to the device you want to restart
- Select a plan type
- Re-enter your card details
- Click 'Pay Now'
Your service will resume as soon as our dashboard receives confirmation of payment from our payment gateway provider.
How to Update Card Details
You can update your payment card details on our website:
- Log in to Dashboard
- Go to Admin > My Subscription
- Click Edit on the subscription you wish to update the card details for
- Click Change Card Details
- Enter updated card information
- Click Update
You’ll have to do this separately for each subscription that you wish to update.
Subscriptions & Plans
Your GPSCOTECH requires an active data subscription:
- Monthly plan: $6.99/month: Flexible, cancel anytime
- Annual plan: $64.99/year ($5.41/month)
- 2-year plan: $119.76/2 year (4.99/month)
Customer Support
We’re here to help!
- 📞 Phone: 1-855-953-2093 (Mon–Fri, 8 AM–4 PM PST)
- ✉️ Email: info@gpscotech.com
- 🌐 Website: gpscotech.com
Safety & Warnings
Installing a wired GPS tracker involves working with your vehicle’s electrical system. Incorrect installation may cause damage to the vehicle, the GPS device, or result in personal injury.
- Professional installation is strongly recommended if you are not experienced with vehicle wiring.
- Always disconnect the vehicle battery before connecting or modifying any wires.
- Never connect wires to unknown circuits or attempt installation without identifying the correct power, ground, and ignition wires.
- Incorrect wiring may cause electrical shorts, blown fuses, or system malfunctions.
- Do not install the device near airbags, steering components, pedals, or moving parts.
- Ensure all wiring is securely insulated and fastened to prevent vibration, wear, or short circuits.
- GPSCOTECH is not responsible for damage caused by improper installation or unauthorized wiring modifications.
If you are unsure at any point during installation, stop and contact a certified installer or our support team for assistance.
Troubleshooting
No GPS location?
Ensure the tracker is properly powered and the vehicle is outdoors. Mount the device facing upward with a clear view of the sky.
Device won’t power on?
Check the power wiring:
- Red wire connected to battery positive (+)
- Black wire connected to ground (–)
Inaccurate location?
GPS signals may be weak due to location. Move the vehicle to an open area and drive for a few minutes to improve accuracy.
- Not syncing with the app?
Restart the app and cycle the vehicle power. Confirm the subscription is active and the device is online.
GPSCOTECH – Protect What Matters. Anywhere. Anytime.